Understanding Google Postmaster Tools: What You Need to Know
← Referenced by 4 posts
As an email email marketer, you must understand your sender reputation in as much detail as possible. If you don’t catch an issue before it’s too late, more and more of your campaigns will be marked as Spam, causing your open rates to plummet. This is a rut that can be seriously difficult to get out of. Understanding Google Postmaster Tools will help with this issue.
One provider that’s well known for not providing a traditional feedback loop is Gmail. This is a huge concern for email deliverability personnel as not only does Gmail currently own 43% of the email service market share in 2020, but they also make up as much as 97% of users on some subscriber lists.
That’s a huge number of subscribers that are potentially at risk, should your sender reputation go from good to bad.
To put it bluntly, having a poor sender reputation on Gmail would cause you some serious headaches.
Thankfully, all is not lost. With the arrival of Postmaster Tools in 2015 email marketers are able to access vital data and diagnostics for valuable feedback on your sender reputation. This is essential data that you should analyze to make informed decisions about your email campaigns.
It’s quick to set up, simple to use, and should form part of a weekly checklist to help you keep an eye on the health of your subscriber lists and sender reputation.
Understanding Google Postmaster Tools: What is it?
Google Postmaster Tools is built for email marketers to access data and diagnostics about their domain reputation and sender reputation. You can use it to analyze your email performance, check spam rates, and keep track of your deliverability rates.
It can be used to identify your current spam rate, and provides delivery errors, domain reputation reports, authentication errors, and feedback loops.
Use it frequently to stay informed about your sender reputation and make sure your emails are arriving in the primary inbox of your subsribers.
How to Set-Up Google Postmaster Tools
One of the best things about Google Postmaster Tools is how easy it is to set up.
Please note, however, that your domain must first be DKIM verified. This verifies your domain as the email sender and is the foundation for many other reputation settings.
If in doubt on how to do this, check the help files on your email marketing platform and domain server or speak to your server admin to complete this step beforehand.
Then, simply go to gmail.com/postmaster/ and click “Get Started”. From here you’ll be prompted to add your domain. (If for any reason you don’t see a prompt, click on the red plus icon in the bottom right-hand corner of the screen). Any previous domains you’ve added - along with the verification status - will be shown on the page.
Authenticating your domain is just as straightforward — Users can add either a TXT or CNAME record to the host’s DNS settings for the chosen domain. If you don’t know how to do this, ask your web developer to do this for you. This should only take a few minutes.
TIP: Once set up, you may have to wait up to 24 hours for the DNS records to propagate, although we often find domain verification to be pretty much instantaneous. Also, don’t expect to see historical data in your account: Google Postmaster Tools starts working the moment you add your domain but won’t show any legacy data.
How to Give Other Users Access To Google Postmaster Tools
Google Postmaster Tools uses your G Suite or Google Apps account. So, if you want to share the domain data with other members of your team, you may want to consider creating an email alias prior to adding your domain name. You can then share the log-in access to this account directly with your team.
Alternatively, you can select any recently added domain and click on the three vertical lines to manage users. Next, use the red plus icon to add the gmail address of any user you want to give read access to the domain. They will then have access to the user dashboard for that domain.
Understanding The Postmaster Tools Dashboard
Now for the real reason you’re here: a tutorial on understanding Google Postmaster Tools. Let’s take a look at the dashboard, and see how you can use this information to find areas for improvement in your email marketing strategy.
The app is entirely web based and the dashboard itself is super easy to use, with a drop down menu that gives access to the full range of available reports, as well as a timeframe filter so you can view your data over the shorter term, or the longer term.
This is useful for spotting changes in your spam rate and sender reputation, and to see at a glance any inconsistencies that arise due to recent changes you have made.
The dropdown tools menu shows the following options:
Spam rate
This is a ratio of the number of emails marked by users as spam, to the number of emails that are placed in the inbox. Typically, you wouldn’t expect to see many results in this tab, provided that you stay on top of your list management and regularly purge un-engaged users.
If you start to see your average spam rate creep above 0.1%, take note -—this could indicate changes that didn’t resonate well with your audience or other factors that need your attention, such as a stale email list.
If your spam rate increases a little just for a day or two, then drops back down below 0.1%, this is generally nothing to be too concerned with. But if the problem persists, you need to take action.
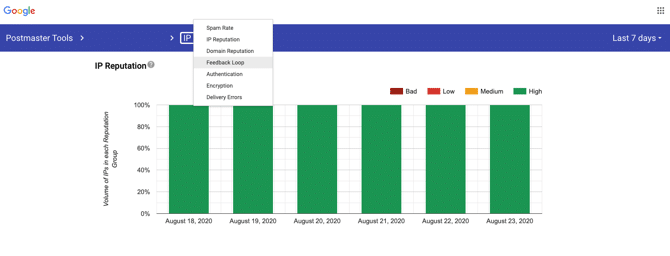
IP reputation
Google Postmaster Tools classifies your sender reputation as either Bad, Low, Medium/Fair, or Good.
A poor reputation will likely result in low deliverability rates, meaning many of your subscribers won’t see your campaigns in their inbox. This is an issue that’s not easy to come back from.
This could affect both your marketing and transactional emails (particularly if you use the same IP address for both), and is influenced by factors such as spam rate, user engagement, suspicious activity on your account, using purchased lists, etc.
Having a good reputation is the name of the game, and will result in more users receiving your email in their inbox. If you see your reputation drop from “Good” to “Fair” or lower, you *must *rectify this as quickly as possible, including halting any suspicious campaigns until you identify the issue.
If your IP reputation drops for no apparent reason, speak to your email marketing platform’s help team. If you’re using a shared IP address, another of their customers could be doing something to damage the IP address that you are using.
If you are using a dedicated IP address, however, the IP reputation should only be affected by what you are doing.
Domain reputation
Your domain reputation follows a similar ranking structure to IP reputation and takes into account spam rates across all your IP addresses, among other things. This can be affected by other companies spoofing your domain, for example, which is why it’s important to verify your domain correctly, with SPF, DKIM and DMARC protocols.
Feedback loop
Google offers its own feedback loop to high volume senders and ESPs (email service provider). So, most users will not be able to set up their own Google FBL. In fact, Google requires senders to send a minimum (undisclosed) number of monthly messages to even access this data. If you don’t see anything in this report then, it’s often nothing to worry about.
If you are seeing flagged identifiers in this report, this is basically giving you aggregate complaint rates from Gmail users, based on messages that land in the inbox, *not *total messages sent.
The main purpose of this report is for ESPs to identify which of their customers are abusing their system. However, as a sender, you may be able to use this information to see which of your own campaigns are receiving excessive number of spam complaints by Gmail users.
Authentication
If you have set everything up correctly, you don’t need to keep such a close eye on this dashboard as the others. This report shows you the percentage of emails that passed SPF, DKIM and DMARC authentication - highlighting any potential errors in your technical setup.
If you do see issues here, you’ll need to make sure each of your DNS settings etc. are set up correctly to protect your sender reputation.
Encryption
Again, if you are on top of your technical config files, this tool should only flag encryption errors that are out of the ordinary. You can view data, such as inbound and outbound TLS reports sent or received from your domain. What this shows you is the percentage of emails that passed TLS (the protocol that encrypts your emails) versus all emails sent or received from the domain.
This can identify potential technical issues but provided you have everything set up correctly, you shouldn’t expect to see encryption errors on the graph. Any errors may indicate a problem with your TLS compliance or hostname certificate validation, which can be set up and checked in your GSuite Admin console.
Delivery errors
This dashboard covers rejected or temporary failed emails. This means that for some reason Gmail has blocked some of your messages from actually being delivered. You want to see the graph at 0%, and if it starts to climb, take action, as you may have fallen foul of one of more real-time blackhole lists.
Fortunately, this dashboard gives some very useful information explaining why you might be seeing delivery errors including:
- Rate limit exceeded.
- Suspected spam
- Email content is possibly spammy
- Bad or unsupported attachment
- DMARC policy of the sender domain
- Sending IP has a low reputation
- Sending domain has a low reputation
- IP is in one or more public RBLs
- Domain is in one or more public RBLs
- Bad or missing PTR record
This is actionable information that you can use to rectify and bad practices you may be inadvertently using.
What to Do if You See Your Data Deteriorating
It’s vital to stay on top of your reputation as a sender but here’s what to do if you see your data in Google Postmaster Tools deteriorating.
1. Don’t panic! A sudden increase in spam complaints doesn’t necessarily mean that your deliverability rate is going to be adversely affected straight away. That said, it is important to take action at the first sign of any anomaly. Choose to let it slide and you could find it hard to recover later.
2. Identify the source of the problem. Work your way through the Postmaster Tools dashboard to see if you can identify where or when the problem first occurred. You can use the time filter to help with this — have you made any recent changes that coincide with a low performance score, such as using a new email template? If so, what was it about a specific campaign or technical detail that was changed? Can you spot any offending identifiers or patterns?
3. Act fast and nip the problem in the bud. Once you have found the root cause of the problem, it’s time to put things right. Pause any campaigns that may be dragging down your score and fix any technical hitches that may be to blame.
4. Monitor the results. You may have solved the problem already, but check Google Postmaster Tools regularly to see if any irregularities still persist in the user dashboard. Then continue to stay on top of your reputation by keeping things under tight control.
The Value of Google Postmaster Tools
As you can see, Postmaster Tools is a seriously valuable resource that helps you to fine tune your email strategy, ensuring you aren’t falling foul of any email deliverability traps.
By assessing and analysing IP and domain reputation, as well as campaign performance, you can use the platform to monitor deliverability rates, understand how Google’s users are responding to your email content and hopefully use this information to improve your conversion percentage across the board.
Used in conjunction with a reliable ESP, Postmaster Tools can improve your email content and deliverability rates, and make sure your emails stay out of the spam box and land in the inbox, where they belong.
References
- [1] Gmail currently own 43% of the email service market share in 2020 — techjury.net
- [2] gmail.com/postmaster/ — gmail.com